M5StackでAE-MOTOR88302個をBlinkで遠隔操作 [Arduino&M5Stack]
注意
Arduinoでは、16進数を右に1ビットシフトする
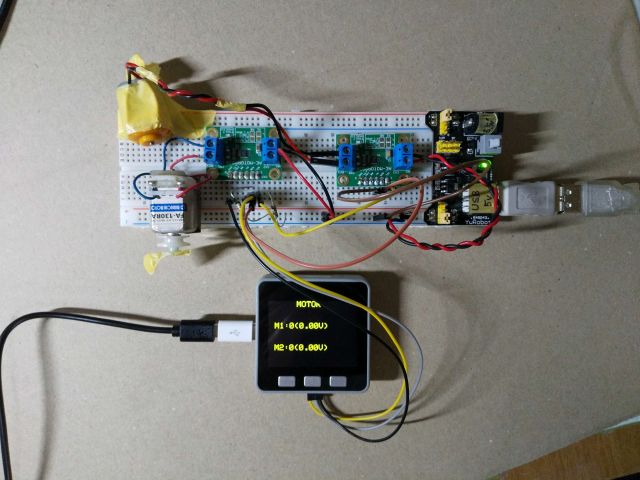
配線
2つのモータードライバーに並列に5V GND SCL SDAを配置
絵は後程追加
ディスプレイにも電圧が表示されます
ソースコード
//参考
//https://spiceman.jp/arduino-drv8830-program/
//https://yujimiyano.tumblr.com/post/89433536983/konashi-2-i2c-ae-drv8830-dc
//https://makers-with-myson.blog.ss-blog.jp/2014-05-15
//

#include <Wire.h>
#include <M5Stack.h>

// I2Cアドレス
#define DRV8830_1 0x64  // DRV8830のI2Cアドレス1
#define DRV8830_2 0x61  // DRV8830のI2Cアドレス2
#define CONTROL 0x00  // CONTROLレジスタのサブアドレス
#define FAULT 0x01    // FAULTレジスタのサブアドレス

int power1_1 = 0;   // +-63諧調あるがBlynkでは+-10諧調
int power1_2 = 0;  // power1_1の値が変わっているかを調べるために変数power1_2を作成
//⇑左(0x64)
//⇓右(0x61)
int power2_1 = 0;
int power2_2 = 0;

//
#define BLYNK_PRINT Serial
#define BLYNK_USE_DIRECT_CONNECT

//#include <M5Stack.h>             //追加部分 上記にあるので削除
#include <BlynkSimpleEsp32_BLE.h>  //追加部分
#include <BLEDevice.h>             //追加部分
#include <BLEServer.h>             //追加部分
char auth[] = "k2sr_8wGTqfHzV9oTpD5Z4f-vh1vUu3i";//追加部分
//


void setup() {
  M5.Speaker.begin(); // これが無いとmuteしても無意味です。
  M5.Speaker.mute();

  Serial.begin(9600);       //追加部分
  //Serial.begin(115200);
  Blynk.setDeviceName("Blynk");   //追加部分
  Blynk.begin(auth);              //追加部分

  Wire.begin();   //I2Cを使う宣言
  M5.begin();     //M5 Stackを使う宣言

  M5.Lcd.setTextColor(YELLOW), M5.Lcd.setTextSize(3), M5.Lcd.setCursor(100, 0); M5.Lcd.print("MOTOR");
  powerdisplay();
}


void loop() {

  Blynk.run();   //追加部分

  M5.update();

  if (power1_1 != power1_2) {
    powerdisplay();
    if (power1_1 > 0) {
      writeRegister(1 ,CONTROL, 0x04 + power1_1, 0x01);
    } else if (power1_1 == 0) {
      writeRegister(1 ,CONTROL, 0x00, 0x00);
    } else if (power1_1 < 0) {
      writeRegister(1 ,CONTROL, 0x04 + power1_1 * -1, 0x02);
    }
    power1_2 = power1_1;
  }

  if (power2_1 != power2_2) {
    powerdisplay();
    if (power2_1 > 0) {
      writeRegister(2 ,CONTROL, 0x04 + power2_1, 0x01);
    } else if (power2_1 == 0) {
      writeRegister(2 ,CONTROL, 0x00, 0x00);
    } else if (power2_1 < 0) {
      writeRegister(2 ,CONTROL, 0x04 + power2_1 * -1, 0x02);
    }
    power2_2 = power2_1;
  }
  delay(100);

}

void writeRegister(byte MotorNumber , byte reg, byte vset, byte DATA) {

  int vdata = vset << 2 | DATA;
  Serial.println(String(vdata, HEX));
  if (MotorNumber == 1) {
    Wire.beginTransmission(DRV8830_1);
    Serial.println("MOTOR_A");
  } else if (MotorNumber == 2) {
    Wire.beginTransmission(DRV8830_2);
    Serial.println("MOTOR_B");
  }
  Wire.write(reg);
  Wire.write(vdata);
  Wire.endTransmission(true);
}

void powerdisplay() {
  M5.Lcd.fillRect(0, 80, 320, 160, BLACK);
  M5.Lcd.setTextColor(YELLOW), M5.Lcd.setTextSize(3.5), M5.Lcd.setCursor(20, 80), M5.Lcd.print("M1:") , M5.Lcd.print(power1_1);
  if (power1_1 == 0) {
    M5.Lcd.print("(0.00V)");
  } else if (power1_1 > 0) {
    M5.Lcd.print("("), M5.Lcd.print(power1_1 * 0.08 + 0.4), M5.Lcd.print("V)");
  } else if (power1_1 < 0) {
    M5.Lcd.print("(-"), M5.Lcd.print((power1_1 * -1) * 0.08 + 0.4), M5.Lcd.print("V)");
  }

  M5.Lcd.setCursor(20, 160), M5.Lcd.print("M2:") , M5.Lcd.print(power2_1);
  if (power2_1 == 0) {
    M5.Lcd.print("(0.00V)");
  } else if (power2_1 > 0) {
    M5.Lcd.print("("), M5.Lcd.print(power2_1 * 0.08 + 0.4), M5.Lcd.print("V)");
  } else if (power2_1 < 0) {
    M5.Lcd.print("(-"), M5.Lcd.print((power2_1 * -1) * 0.08 + 0.4), M5.Lcd.print("V)");
  }
}

//追加部分
BLYNK_WRITE(V0) {    //V0の値を取得する
  power1_1 = param[0].asInt();  // V2の値をPowerに入れる
  Serial.print("1_");
  Serial.println(power1_1);
}
BLYNK_WRITE(V1) {    //V0の値を取得する
  power2_1 = param[0].asInt();  // V2の値をPowerに入れる
  Serial.print("2_");
  Serial.println(power2_1);
}
2021-01-16 13:54
nice!(0)
コメント(0)


コメント 0