前の10件 | -
Studio ftn Score Editor を使ってみた
今回は、楽譜を使ってMIDIなどを作成するおすすめMIDシーケンサを紹介します
その名も Studio ftn Score Editor です!!
窓の杜 https://forest.watch.impress.co.jp/library/software/ftnscoreedit/
こちらは、五線譜に音符や休符をぺたぺたつけたりして、音楽を作るソフトです。音源もMIDIなら16チャンネル(10チャンネルはパーカッション譜でその中の音源は分割してもOK)作れたりします。ここでは、MIDIの機能について注目していきます
Studio ftn Score Editor には、無料版と有料版があります
有料版は5670円ですぜひ、いいと思ったら買ってみてください
使い方
基本的な使い方は同じで、(カッコ内ではとある楽譜を写してみた時の感想を書いています)
1.音源設定などをして使う音設定をする(パーカッションもしたよ)
2.楽譜に設定を割り当てる(めっちゃ段数増えた作曲あった)
3.楽譜を横に伸ばして(67小節のやつあってたいへん)
4.メニューから音符や休符などを選んでぺたぺた貼り付ける(67小節あったからめっちゃ時間かかった)
5.再生したりして…
6.保存する 独自ファイルやMIDIファイルで保存できる(できたときめっちゃ喜んだ)
機能について・作ってみて
・まずめっちゃ使いやすい
使い方がシンプルでサクサク動く。右クリックしながらメニューを選ぶのもすごいやりやすい。
・無料版でもめっちゃ機能が多い
無料版でも64分音符・休符や9連符があったり、装飾記号、繰り返し記号、タイ、パーカッション音符、強弱設定なども豊富にある有料版になるとさらにスラーやコード、クレッシェンド、テキスト、移調もできるようになる
・無料版でもMIDIにできる
・無料版でも、楽譜の量に制限はない
・更新頻度が高い
最低でも1~2か月に一回はしている。2021/02/02更新→2021/02/04更新という2日更新の時もあった。とてもうれしい(バグがなくなる?)
などなど、とても便利で使いやすいです
その他機能についてはこちらを見てください
http://studio-arts.bglb.jp/studio-ftn/se/9/manual/
マニュアルです
後日写真などを載せた使い方ページを作っていきます
終わりに
このStudio ftn Score Editorは、無料版があってもとても作曲をするには十分な機能が入っています。有料版にすれば歌詞を付けたりなどなどもっとたくさんの機能が使えますぜひ、ダウンロードしてみてくださいまた有料版もぜひ良ければ買ってみてください
Visual BasicでHTML特殊文字変換ソフト作ってみた [Visual Basic]
今回は、前回
ソースコードをSS-Blogブログに貼る
https://hrt-13856.blog.ss-blog.jp/2021-01-16-3
をしましたが、ここで、HTML特殊文字変換をしないといけないといいました。実際、そのサイトを見つけましたが
https://tech-unlimited.com/escape.html
簡単にやりたいなーと思ったので、Visual Basicで作ってみました
かかる時間は、もっとかかりますが、オフラインでもできます(でもブログするにはオンラインでやるから…)
参考
プログレスバーが徐々に伸びるのを無効にする
https://dobon.net/vb/dotnet/control/pbdisableanimation.html
コンポーネントは、出てくるやつを貼っておけばOKですが、いちよう書いておきます
コンポーネント 名前 位置
Button1 開始 左上
Button2 ファイルを読み込み 今は機能なし なくてもいい
Button3 ファイルを保存 今は機能なし なくてもいい
Button4 停止 Button1と重ねて最背面に移動
タブコントロール1 真ん中に ★
index
・1 変換前 Backcolorを「システム」の「コントロール」にする
・2 変換後 Backcolorを「システム」の「コントロール」にする
Textbox1 タブ1「変更前」に貼り付け ★
Textbox2 タブ2「変更後」に貼り付け ★
プログレスバー1 上部に入れる Anchorは Top, Left, [Right] ( [ ] 内を追加)
★がついているもののAnchorは Top, [Bottom], Left, [Right] ( [ ] 内を追加)
ソースコード
このソースコード化ではC言語用なのかVisual Basicにはあまり対応していないようです。ご自分でコピペしてみてください。
" ' "でコメントアウトしてあるように、[Case]文はなるべく使わず[if]文を使うことをお勧めします
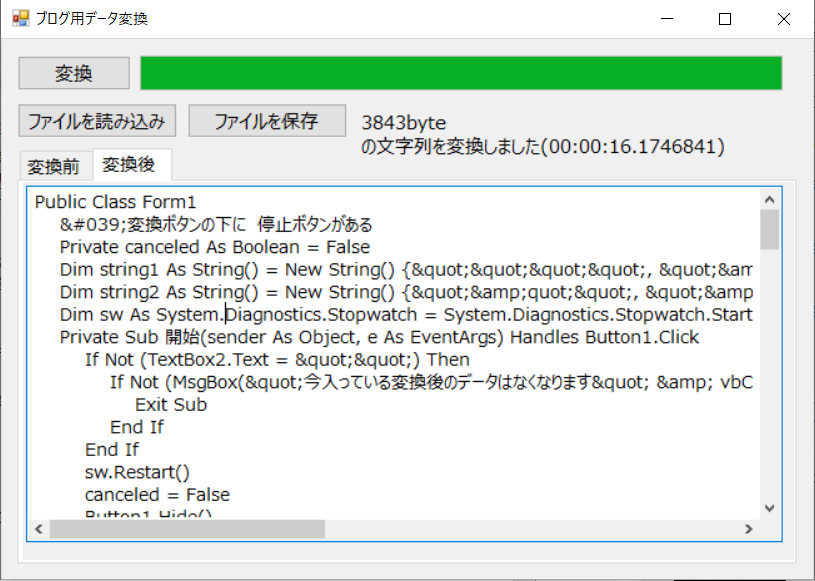
こんな画面になります。コンポーネントの配置にもお使いください(タブは「変換後」つまりTextbox2が見えている状態ですが、「変換前」タブのTextbox1も同じような配置です)。ちなみにこれは、上にのせたソースコードの変換後です。約16秒でした。サイトに比べるととても遅いですが、使う分には問題ありません。

ソースコードをSS-Blogブログに貼る
https://hrt-13856.blog.ss-blog.jp/2021-01-16-3
をしましたが、ここで、HTML特殊文字変換をしないといけないといいました。実際、そのサイトを見つけましたが
https://tech-unlimited.com/escape.html
簡単にやりたいなーと思ったので、Visual Basicで作ってみました
かかる時間は、もっとかかりますが、オフラインでもできます(でもブログするにはオンラインでやるから…)
参考
プログレスバーが徐々に伸びるのを無効にする
https://dobon.net/vb/dotnet/control/pbdisableanimation.html
コンポーネントは、出てくるやつを貼っておけばOKですが、いちよう書いておきます
コンポーネント 名前 位置
Button1 開始 左上
Button2 ファイルを読み込み 今は機能なし なくてもいい
Button3 ファイルを保存 今は機能なし なくてもいい
Button4 停止 Button1と重ねて最背面に移動
タブコントロール1 真ん中に ★
index
・1 変換前 Backcolorを「システム」の「コントロール」にする
・2 変換後 Backcolorを「システム」の「コントロール」にする
Textbox1 タブ1「変更前」に貼り付け ★
Textbox2 タブ2「変更後」に貼り付け ★
プログレスバー1 上部に入れる Anchorは Top, Left, [Right] ( [ ] 内を追加)
★がついているもののAnchorは Top, [Bottom], Left, [Right] ( [ ] 内を追加)
ソースコード
Public Class Form1
'変換ボタンの下に 停止ボタンがある
Private canceled As Boolean = False
Dim string1 As String() = New String() {"""", "&", "'", "<", ">"}
Dim string2 As String() = New String() {""", "&", "'", "<", ">"}
Dim sw As System.Diagnostics.Stopwatch = System.Diagnostics.Stopwatch.StartNew()
Private Sub 開始(sender As Object, e As EventArgs) Handles Button1.Click
If Not (TextBox2.Text = "") Then
If Not (MsgBox("今入っている変換後のデータはなくなります" & vbCrLf & "よろしいですか", vbOKCancel, "変換後のデータはなくなります") = vbOK) Then
Exit Sub
End If
End If
sw.Restart()
canceled = False
Button1.Hide()
Button2.Enabled = False
Button3.Enabled = False
Button4.Show()
TextBox2.Clear()
Dim stringlen As Long = Len(TextBox1.Text)
'Label1.Text = stringlen & "byteの文字列を変換中..."
'MsgBox(stringlen)
ProgressBar1.Maximum = stringlen
For i As Long = 1 To stringlen
Label1.Text = i & "/" & stringlen & "byte" & vbCrLf & "の文字列を変換中...(" & sw.Elapsed.ToString & ")"
Application.DoEvents()
'キャンセルボタンがクリックされたか調べる
If canceled Then
Label1.Text = i & "/" & stringlen & "byte" & vbCrLf & "の文字列を変換中に終了しました(" & sw.Elapsed.ToString & ")"
Exit Sub
End If
If 0 <= Array.IndexOf(string1, Mid(TextBox1.Text, i, 1)) Then
TextBox2.AppendText(string2(Array.IndexOf(string1, Mid(TextBox1.Text, i, 1))))
Else
TextBox2.AppendText(Mid(TextBox1.Text, i, 1))
End If
'Select Case Mid(TextBox1.Text, i, 1)
' Case "<"
' TextBox2.AppendText("<")
' Case ">"
' TextBox2.AppendText(">")
' Case """"
' TextBox2.AppendText(""")
' Case "&"
' TextBox2.AppendText("&")
' Case "'"
' TextBox2.AppendText("'")
' Case Else
' TextBox2.AppendText(Mid(TextBox1.Text, i, 1))
'End Select
SetProgressBarValue(ProgressBar1, i)
Label1.Refresh()
ProgressBar1.Refresh()
Next
Button1.Show()
Button2.Enabled = True
Button3.Enabled = True
Button4.Hide()
Label1.Text = stringlen & "byte" & vbCrLf & "の文字列を変換しました(" & sw.Elapsed.ToString & ")"
sw.Stop()
sw.Reset()
End Sub
Private Sub Form1_Load(sender As Object, e As EventArgs) Handles Me.Load
TextBox1.Multiline = True
TextBox1.ScrollBars = ScrollBars.Both
TextBox1.WordWrap = False
TextBox2.Multiline = True
TextBox2.ScrollBars = ScrollBars.Both
TextBox2.WordWrap = False
Button4.Enabled = True
End Sub
Private Sub Button4_Click(sender As Object, e As EventArgs) Handles Button4.Click
Button1.Show()
Button2.Enabled = True
Button3.Enabled = True
Button4.Hide()
canceled = True
End Sub
Private Sub SetProgressBarValue(pb As ProgressBar, val As Long)
If pb.Value < val Then
'値を増やす時
If val < pb.Maximum Then
'目的の値より一つ大きくしてから、目的の値にする
pb.Value = val + 1
pb.Value = val
Else
'最大値にする時
'最大値を1つ増やしてから、元に戻す
pb.Maximum += 1
pb.Value = val + 1
pb.Value = val
pb.Maximum -= 1
End If
Else
'値を減らす時は、そのまま
pb.Value = val
End If
End Sub
End Class
このソースコード化ではC言語用なのかVisual Basicにはあまり対応していないようです。ご自分でコピペしてみてください。
" ' "でコメントアウトしてあるように、[Case]文はなるべく使わず[if]文を使うことをお勧めします
こんな画面になります。コンポーネントの配置にもお使いください(タブは「変換後」つまりTextbox2が見えている状態ですが、「変換前」タブのTextbox1も同じような配置です)。ちなみにこれは、上にのせたソースコードの変換後です。約16秒でした。サイトに比べるととても遅いですが、使う分には問題ありません。
ソースコードをSS-Blogブログに貼る [SS-Blog]
今回は、このSS‐Blogブログにソースコードを貼っていきます。
参考
https://cozy-growth.blog.ss-blog.jp/2017-07-27
ブログのHTMLを編集
ここで、自分のブログのHTMLを付け加えてソースコード化できるようにします。この操作は、1ユーザーに対して1回でいいです。また、HTMLは、いつでも追加・編集・削除ができます
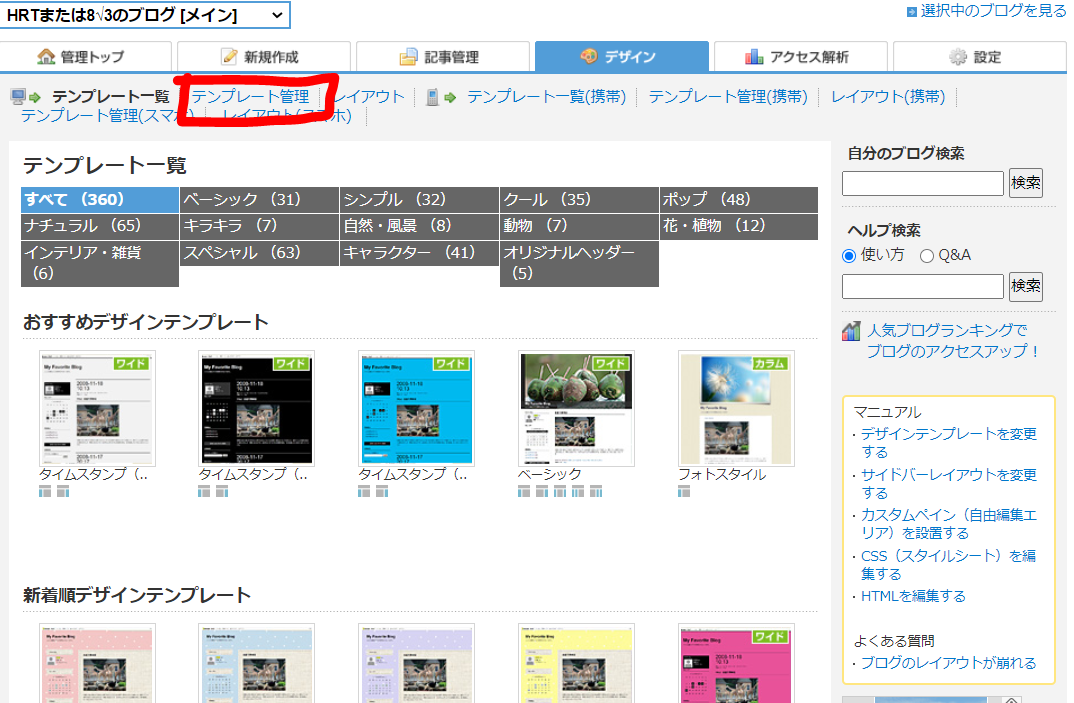
「デザイン」タブを開いて

「テンプレート管理」を開いて

「HTMLの追加」を押して

最後に保存を押す
これで設定は完了です
使い方
ここで、実際にソースコード化してみます。ここの操作は、使いたいとき、その場所で行ってください。
1.以下のサイトで、HTML特殊文字変換をする
<や>、&などは、HTMLの最初の文字と認識され、ソースコードに支障が出てしまうので、ここで、特殊文字を変換します。
https://tech-unlimited.com/escape.html
自分でも作ってみました
https://hrt-13856.blog.ss-blog.jp/2021-01-17
2.ソースコードを入れる
ソースコードを入れたいところで
~~~~~~~~~~~~~~~~~~~~~~~~~~~~~~~~~~~
<pre class="prettyprint linenums:1">
ソースコード
</pre>
~~~~~~~~~~~~~~~~~~~~~~~~~~~~~~~~~~~
と記入すると、ブレビューなどで、ソースコード化していると思います。
ポイント
ソースコードを入れると、たまに、
例:さっきのHTMLで追加する文章
改行が変になってコピペしても元の文に戻らないとこがある。そんなときは、
このようにHTMLの特殊文字以外の文字を先に入れるといい
プログラムのソースコードでこんなことが起こったら、コメントアウトの文字
(C言語 " / ")
(VB " ' ")
を入れるといいかも
参考
https://cozy-growth.blog.ss-blog.jp/2017-07-27
ブログのHTMLを編集
ここで、自分のブログのHTMLを付け加えてソースコード化できるようにします。この操作は、1ユーザーに対して1回でいいです。また、HTMLは、いつでも追加・編集・削除ができます
「デザイン」タブを開いて
「テンプレート管理」を開いて

「HTMLの追加」を押して

/head で検索して、
</head>の上に次のコードを追加(ここはいらない)

<script src="https://cdn.rawgit.com/google/code-prettify/master/loader/run_prettify.js"></script>
<link rel="stylesheet" href="https://cdn.rawgit.com/google/code-prettify/master/styles/sons-of-obsidian.css" type="text/css" />
<style type="text/css">
pre {
    white-space: -moz-pre-wrap;
    white-space: -pre-wrap;
    white-space: -o-pre-wrap;
    white-space: pre-wrap;
    word-wrap: break-word;
}
</style>
最後に保存を押す
これで設定は完了です
使い方
ここで、実際にソースコード化してみます。ここの操作は、使いたいとき、その場所で行ってください。
1.以下のサイトで、HTML特殊文字変換をする
<や>、&などは、HTMLの最初の文字と認識され、ソースコードに支障が出てしまうので、ここで、特殊文字を変換します。
https://tech-unlimited.com/escape.html
自分でも作ってみました
https://hrt-13856.blog.ss-blog.jp/2021-01-17
2.ソースコードを入れる
ソースコードを入れたいところで
~~~~~~~~~~~~~~~~~~~~~~~~~~~~~~~~~~~
<pre class="prettyprint linenums:1">
ソースコード
</pre>
~~~~~~~~~~~~~~~~~~~~~~~~~~~~~~~~~~~
と記入すると、ブレビューなどで、ソースコード化していると思います。
こんな感じになっています
<や>などには気を付けてねー
(プログラムだと"こんな風"に色も付きます。自分のコードを貼ってみて試してください)
ポイント
ソースコードを入れると、たまに、
例:さっきのHTMLで追加する文章
<script src="https://cdn.rawgit.com/google/code-prettify/master/loader/run_prettify.js"></script>
<link rel="stylesheet" href="https://cdn.rawgit.com/google/code-prettify/master/styles/sons-of-obsidian.css" type="text/css" />
<style type="text/css">
pre {
    white-space: -moz-pre-wrap;
    white-space: -pre-wrap;
    white-space: -o-pre-wrap;
    white-space: pre-wrap;
    word-wrap: break-word;
}
</style>
改行が変になってコピペしても元の文に戻らないとこがある。そんなときは、
/
<script src="https://cdn.rawgit.com/google/code-prettify/master/loader/run_prettify.js"></script>
<link rel="stylesheet" href="https://cdn.rawgit.com/google/code-prettify/master/styles/sons-of-obsidian.css" type="text/css" />
<style type="text/css">
pre {
    white-space: -moz-pre-wrap;
    white-space: -pre-wrap;
    white-space: -o-pre-wrap;
    white-space: pre-wrap;
    word-wrap: break-word;
}
</style>
このようにHTMLの特殊文字以外の文字を先に入れるといい
プログラムのソースコードでこんなことが起こったら、コメントアウトの文字
(C言語 " / ")
(VB " ' ")
を入れるといいかも
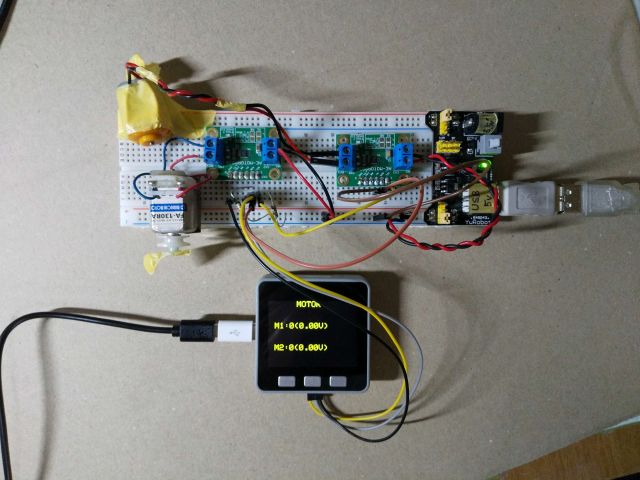
M5StackでAE-MOTOR88302個をBlinkで遠隔操作 [Arduino&M5Stack]
注意
Arduinoでは、16進数を右に1ビットシフトする
配線
2つのモータードライバーに並列に5V GND SCL SDAを配置
絵は後程追加
ディスプレイにも電圧が表示されます
ソースコード
//参考
//https://spiceman.jp/arduino-drv8830-program/
//https://yujimiyano.tumblr.com/post/89433536983/konashi-2-i2c-ae-drv8830-dc
//https://makers-with-myson.blog.ss-blog.jp/2014-05-15
//

#include <Wire.h>
#include <M5Stack.h>

// I2Cアドレス
#define DRV8830_1 0x64  // DRV8830のI2Cアドレス1
#define DRV8830_2 0x61  // DRV8830のI2Cアドレス2
#define CONTROL 0x00  // CONTROLレジスタのサブアドレス
#define FAULT 0x01    // FAULTレジスタのサブアドレス

int power1_1 = 0;   // +-63諧調あるがBlynkでは+-10諧調
int power1_2 = 0;  // power1_1の値が変わっているかを調べるために変数power1_2を作成
//⇑左(0x64)
//⇓右(0x61)
int power2_1 = 0;
int power2_2 = 0;

//
#define BLYNK_PRINT Serial
#define BLYNK_USE_DIRECT_CONNECT

//#include <M5Stack.h>             //追加部分 上記にあるので削除
#include <BlynkSimpleEsp32_BLE.h>  //追加部分
#include <BLEDevice.h>             //追加部分
#include <BLEServer.h>             //追加部分
char auth[] = "k2sr_8wGTqfHzV9oTpD5Z4f-vh1vUu3i";//追加部分
//


void setup() {
  M5.Speaker.begin(); // これが無いとmuteしても無意味です。
  M5.Speaker.mute();

  Serial.begin(9600);       //追加部分
  //Serial.begin(115200);
  Blynk.setDeviceName("Blynk");   //追加部分
  Blynk.begin(auth);              //追加部分

  Wire.begin();   //I2Cを使う宣言
  M5.begin();     //M5 Stackを使う宣言

  M5.Lcd.setTextColor(YELLOW), M5.Lcd.setTextSize(3), M5.Lcd.setCursor(100, 0); M5.Lcd.print("MOTOR");
  powerdisplay();
}


void loop() {

  Blynk.run();   //追加部分

  M5.update();

  if (power1_1 != power1_2) {
    powerdisplay();
    if (power1_1 > 0) {
      writeRegister(1 ,CONTROL, 0x04 + power1_1, 0x01);
    } else if (power1_1 == 0) {
      writeRegister(1 ,CONTROL, 0x00, 0x00);
    } else if (power1_1 < 0) {
      writeRegister(1 ,CONTROL, 0x04 + power1_1 * -1, 0x02);
    }
    power1_2 = power1_1;
  }

  if (power2_1 != power2_2) {
    powerdisplay();
    if (power2_1 > 0) {
      writeRegister(2 ,CONTROL, 0x04 + power2_1, 0x01);
    } else if (power2_1 == 0) {
      writeRegister(2 ,CONTROL, 0x00, 0x00);
    } else if (power2_1 < 0) {
      writeRegister(2 ,CONTROL, 0x04 + power2_1 * -1, 0x02);
    }
    power2_2 = power2_1;
  }
  delay(100);

}

void writeRegister(byte MotorNumber , byte reg, byte vset, byte DATA) {

  int vdata = vset << 2 | DATA;
  Serial.println(String(vdata, HEX));
  if (MotorNumber == 1) {
    Wire.beginTransmission(DRV8830_1);
    Serial.println("MOTOR_A");
  } else if (MotorNumber == 2) {
    Wire.beginTransmission(DRV8830_2);
    Serial.println("MOTOR_B");
  }
  Wire.write(reg);
  Wire.write(vdata);
  Wire.endTransmission(true);
}

void powerdisplay() {
  M5.Lcd.fillRect(0, 80, 320, 160, BLACK);
  M5.Lcd.setTextColor(YELLOW), M5.Lcd.setTextSize(3.5), M5.Lcd.setCursor(20, 80), M5.Lcd.print("M1:") , M5.Lcd.print(power1_1);
  if (power1_1 == 0) {
    M5.Lcd.print("(0.00V)");
  } else if (power1_1 > 0) {
    M5.Lcd.print("("), M5.Lcd.print(power1_1 * 0.08 + 0.4), M5.Lcd.print("V)");
  } else if (power1_1 < 0) {
    M5.Lcd.print("(-"), M5.Lcd.print((power1_1 * -1) * 0.08 + 0.4), M5.Lcd.print("V)");
  }

  M5.Lcd.setCursor(20, 160), M5.Lcd.print("M2:") , M5.Lcd.print(power2_1);
  if (power2_1 == 0) {
    M5.Lcd.print("(0.00V)");
  } else if (power2_1 > 0) {
    M5.Lcd.print("("), M5.Lcd.print(power2_1 * 0.08 + 0.4), M5.Lcd.print("V)");
  } else if (power2_1 < 0) {
    M5.Lcd.print("(-"), M5.Lcd.print((power2_1 * -1) * 0.08 + 0.4), M5.Lcd.print("V)");
  }
}

//追加部分
BLYNK_WRITE(V0) {    //V0の値を取得する
  power1_1 = param[0].asInt();  // V2の値をPowerに入れる
  Serial.print("1_");
  Serial.println(power1_1);
}
BLYNK_WRITE(V1) {    //V0の値を取得する
  power2_1 = param[0].asInt();  // V2の値をPowerに入れる
  Serial.print("2_");
  Serial.println(power2_1);
}
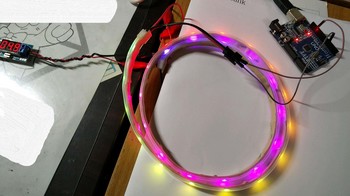
ArduinoでNeopixcel SK6812を動かす [Arduino]
今回は、Arduino・M5Stack・M5StickCでNeopixcelを動かしました。
配線
制御側
GNDーGND(黒線)
GPIO(どれか)ー制御ピン(緑線)
電源側
(モバイルバッテリー)
5V -5V(赤線)
GNDーGND(黒線)
絵は後程記載します
Adafruit_NeoPixel.hは、あらかじめライブラリーマネージャーからダウンロードしておきましょう
ソースコード
M5Stack・M5Stickを使うときはヘッダーを忘れずに
ポイント
明るさを暗くするには色を混ぜる量をすべて同じ比で減らす
動かすと、LEDが順番にずれながらひかっていきます
配線
制御側
GNDーGND(黒線)
GPIO(どれか)ー制御ピン(緑線)
電源側
(モバイルバッテリー)
5V -5V(赤線)
GNDーGND(黒線)
絵は後程記載します
Adafruit_NeoPixel.hは、あらかじめライブラリーマネージャーからダウンロードしておきましょう
ソースコード
#include <M5StickC.h>
#include <Adafruit_NeoPixel.h>

#define PIN 0       //信号端子のピン番号
#define LED_NUM 50  //LEDの数

Adafruit_NeoPixel ledtape = Adafruit_NeoPixel(LED_NUM, PIN, NEO_GRB + NEO_KHZ800);  //3つめのパラメータは使うLEDテープの制御ICがWS2812ならNEO_KHZ800 / WS2811ならNEO_KHZ400

void setup() {
  M5.begin();
  ledtape.begin();
  ledtape.show();   //一旦全てOFFの状態で反映
}

void loop() {
 uint16_t i, j;

 for(j=0; j <256; j++) {
   for(i=0; i < ledtape.numPixels(); i++) {
     ledtape.setPixelColor(i, rotateColor((((i) * 256 / ledtape.numPixels()) + j) & 255));
   }
   ledtape.show();
   delay(0);
 }
}

//RGBの色の移り変わり関数
uint32_t rotateColor(byte WheelPos) {
  byte n;
  n = 10;

  if(WheelPos < 85) {
   return ledtape.Color((WheelPos * 3) / n, (255 - WheelPos * 3) / n, 0);
  } else if(WheelPos < 170) {
   WheelPos -= 85;
   return ledtape.Color((255 - WheelPos * 3) / n, 0, (WheelPos * 3) / n);
  } else {
   WheelPos -= 170;
   return ledtape.Color(0, (WheelPos * 3) / n, (255 - WheelPos * 3) / n);
  }
}
M5Stack・M5Stickを使うときはヘッダーを忘れずに
ポイント
明るさを暗くするには色を混ぜる量をすべて同じ比で減らす
動かすと、LEDが順番にずれながらひかっていきます

M5Stackで2つの温度センサー(SHT31 HIH6130)で温度・湿度測定・Ambientクラウド送信・SD保存 [Arduino&M5Stack]
今回は、温度センサーを2つ動かしました
おんなじセンサーが見あたらなかったので、2種類の温度センサーを使いました。
SHT31 https://akizukidenshi.com/catalog/g/gK-12125/
HIH6130 https://www.switch-science.com/catalog/1104/
センサーについては↑をご覧ください
今回の機能
・M5Stackでコンパクトに
・X分おきの温度・湿度計測
・SDに書き込み
・見やすいやつ
・データ化できる形式(","区切り)
・ネットに接続で時刻取得
・Ambientクラウドに送信
ネット機能についてはオフラインでも飛ばして使用できます。よって、オンラインでないといけないというわけではありません。
オンライン機能についての注意
ここでのWifiは、モバイルでのルーターのみ使えます。スマホなどのテザリングだと、うまくいきません(うまくいってたら教えてください)
Arduino IDEの設定
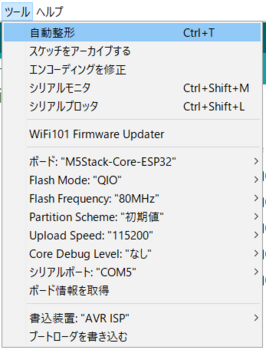
「ツール」タブをこのように設定してください(COMは例です 別の番号になる人もいると思います)
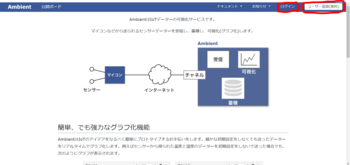
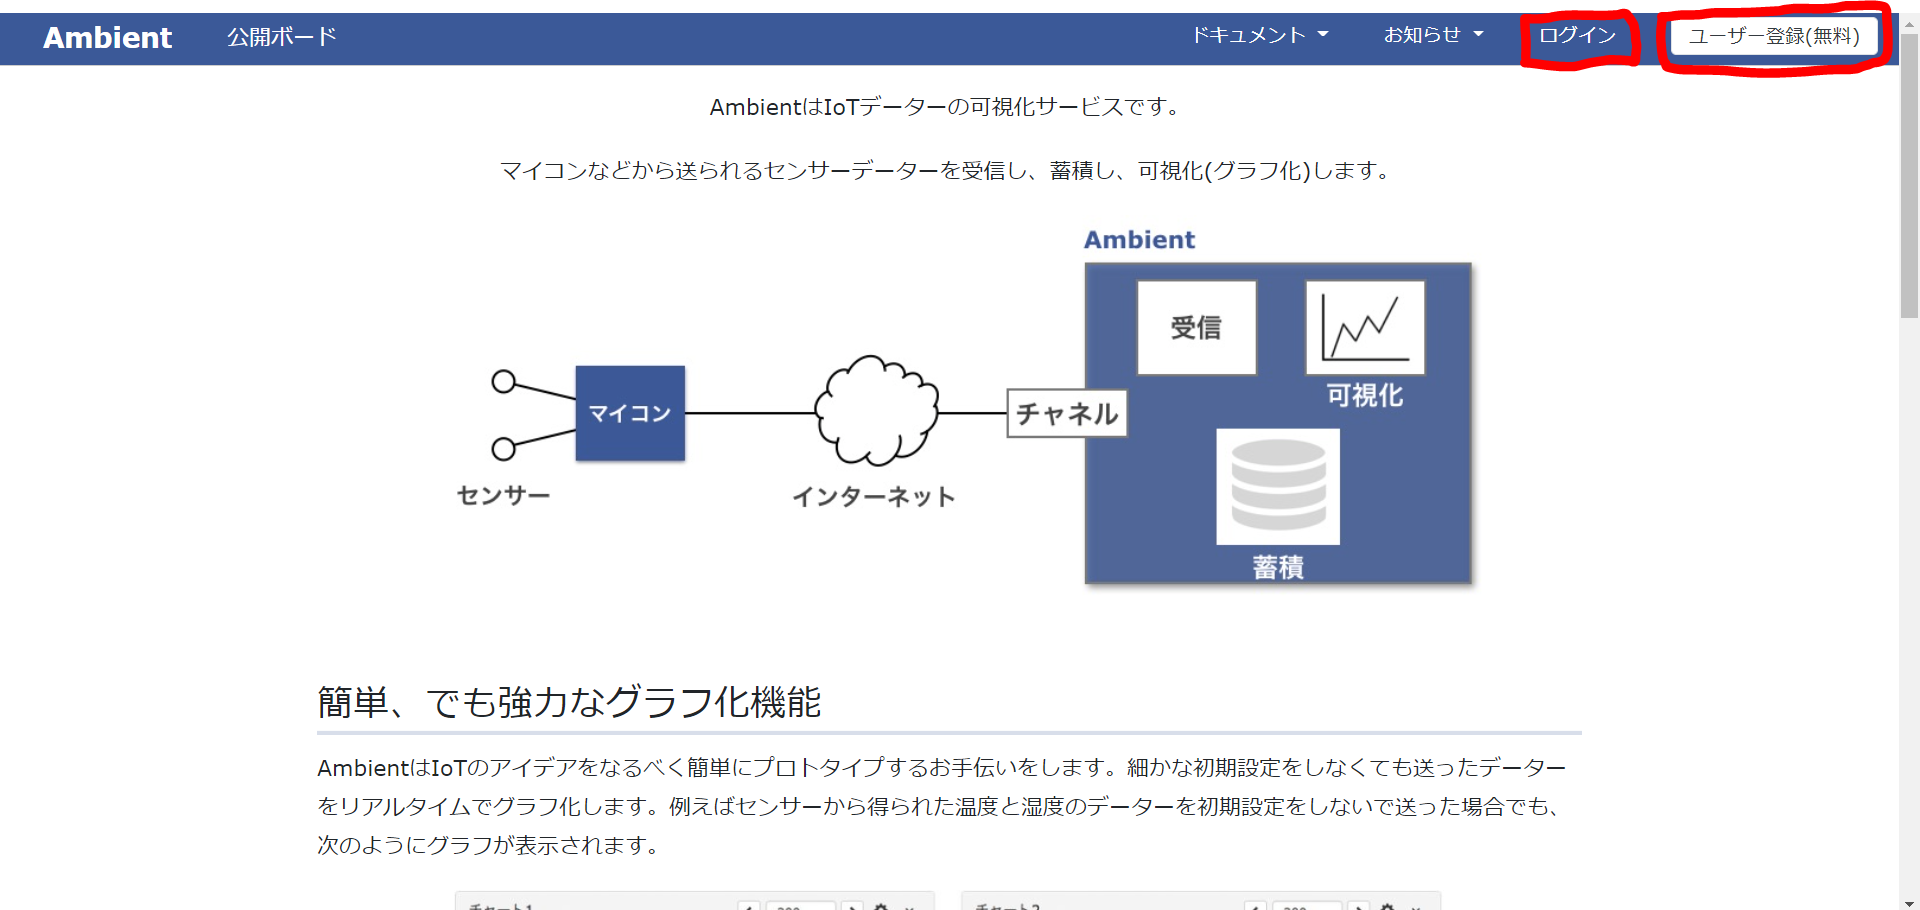
Ambientの設定
Ambientは、初期の設定が必要です
1.Ambientにログイン
Ambientでログインまたはアカウント作成(無料)してください
サイト https://ambidata.io/

↑ログイン方法

チャンネルがない人はここでチャンネルを作ってください。ある人は、チャンネルの「チャンネルID」「ライトキー」をメモって下さい(画像粗くてすみません)
配線
M5Stackの横に、「5V」「GND」「SCL」「SDA」というI2c通信のピンがあるので、これをつなげます。
並列に2つのセンサーにつなげます(4種類のみでいいです)
絵は後日記載
ソースコード
SDは入れておいてください
結果
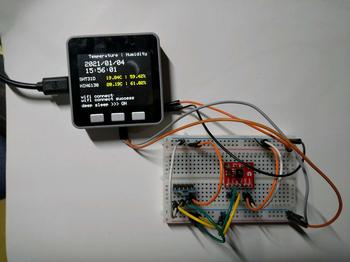
起動すると、左下に「deep sleep >>> ON」と出てきます。この時に左のボタンを長押しすると、ONとOFFをトグルできます。ですが、普通はONのままです。内臓電池が持ちます。
5秒後にデータをとってLCD表示します
そして、Wifiにつなげようとします。
接続されれば、Ambient送信・時刻受信・SD記録(時刻あり)します
接続されなければ SD記録(時刻なし)します
5分間(初期値) スリープ(deep sleep >>> ONの場合・deep sleep >>> OFFならそのまま)します
おんなじセンサーが見あたらなかったので、2種類の温度センサーを使いました。
SHT31 https://akizukidenshi.com/catalog/g/gK-12125/
HIH6130 https://www.switch-science.com/catalog/1104/
センサーについては↑をご覧ください
今回の機能
・M5Stackでコンパクトに
・X分おきの温度・湿度計測
・SDに書き込み
・見やすいやつ
・データ化できる形式(","区切り)
・ネットに接続で時刻取得
・Ambientクラウドに送信
ネット機能についてはオフラインでも飛ばして使用できます。よって、オンラインでないといけないというわけではありません。
オンライン機能についての注意
ここでのWifiは、モバイルでのルーターのみ使えます。スマホなどのテザリングだと、うまくいきません(うまくいってたら教えてください)
Arduino IDEの設定
「ツール」タブをこのように設定してください(COMは例です 別の番号になる人もいると思います)
Ambientの設定
Ambientは、初期の設定が必要です
1.Ambientにログイン
Ambientでログインまたはアカウント作成(無料)してください
サイト https://ambidata.io/
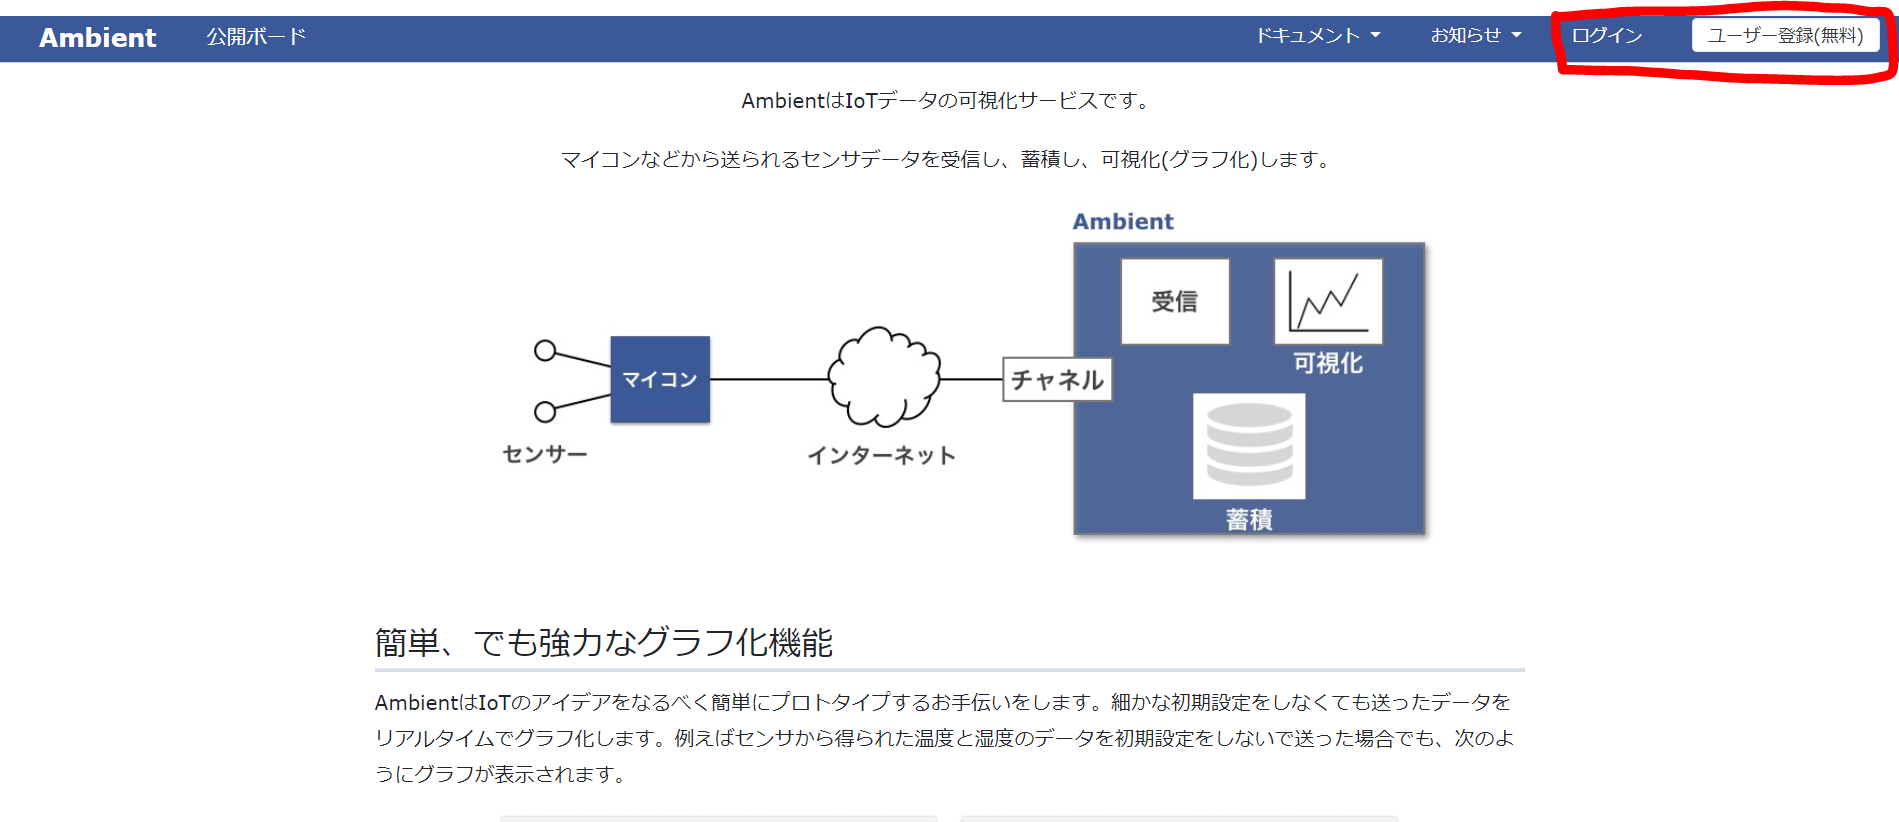
↑ログイン方法

チャンネルがない人はここでチャンネルを作ってください。ある人は、チャンネルの「チャンネルID」「ライトキー」をメモって下さい(画像粗くてすみません)
配線
M5Stackの横に、「5V」「GND」「SCL」「SDA」というI2c通信のピンがあるので、これをつなげます。
並列に2つのセンサーにつなげます(4種類のみでいいです)
絵は後日記載
ソースコード
#include "ClosedCube_SHT31D.h"
#include <M5Stack.h>
#include <WiFi.h>
#include <Ambient.h>
#include "time.h"

ClosedCube_SHT31D sht3xd;

const char* fname = "/temperature_Humidity_log.txt";  //Filepass 普通のデータ
const char* fname2 = "/temperature_Humidity_log_data.txt";  //Filepass2 ","区切りデータ
long timer = 300;                                     //データを取る時間(X秒おき)。timer > 10
const char* ssid = "***************";                 //Wifi SSID
const char* password = "***************";             //Wifi パスワード
WiFiClient CLIENT;
Ambient ambient;                                     //ambientオブジェクト作成
unsigned int channelid = ****;                       //ambient チャンネルID
const char* writekey = "****************";           //ambient ライトキー

#define HIH6130_ADDR 0x27

byte type = 0;


void setup()
{
  //Wire.begin();
  M5.begin();
  M5.Power.begin();
  M5.Lcd.clear(BLACK);
  Serial.begin(115200);
  sht3xd.begin(0x45); // SHT-31起動  I2C address: 0x44 or 0x45
}

void loop() {
  M5.Lcd.setTextSize(2.5), M5.Lcd.setTextColor(WHITE);
  if (type == 0) {
    M5.Lcd.setCursor(0, 220), M5.Lcd.println("deep sleep >>> ON");
  } else {
    M5.Lcd.setCursor(0, 220), M5.Lcd.println("deep sleep >>> OFF");
  }
  delay(5000);
  M5.update();
  if (M5.BtnA.isPressed()) {
    M5.Lcd.clear(BLACK);
    if (type == 0) {
      type = 1;
      M5.Lcd.setCursor(0, 220), M5.Lcd.println("deep sleep >>> OFF");
    } else {
      type = 0;
      M5.Lcd.setCursor(0, 220), M5.Lcd.println("deep sleep >>> ON");
    }
  }

  unsigned int dac[4];
  int i, t, h;
  float temp, humi;

  Wire.beginTransmission(HIH6130_ADDR);
  Wire.endTransmission();
  delay(100);

  Wire.requestFrom(HIH6130_ADDR, 4);
  for (i = 0 ; i < 4; i++ ) {
    dac[i] = Wire.read();
  }
  Wire.endTransmission();

  h = ((dac[0] & 0x3f) << 8) | dac[1];
  humi = (float)(h) / 16383 * 100;

  t = (dac[2] << 6) | (dac[3] >> 2);
  temp = (float)(t) / 16383 * 165 - 40;

  printResult(sht3xd.readTempAndHumidity(SHT3XD_REPEATABILITY_LOW, SHT3XD_MODE_CLOCK_STRETCH, 50), temp, humi);
  delay(5000);
  if (type == 0) {
    M5.Power.deepSleep(SLEEP_SEC(timer - 10));
  } else {
    delay((timer - 10) * 1000);
    M5.Lcd.clear(BLACK);
  }

  //    delay(250);
  //    printResult("Pooling Mode", sht3xd.readTempAndHumidity(SHT3XD_REPEATABILITY_HIGH, SHT3XD_MODE_POLLING, 50));
  //    delay(250);
}

void printResult( SHT31D result, float HIH_6130_temp, float HIH_6130_humi) {
  if (result.error == SHT3XD_NO_ERROR) {
    float SHT31D_temp = result.t;
    float SHT31D_humi = result.rh;
    M5.update();
    Serial.println("--------------------------------------------------");
    Serial.println("SHT31D");
    Serial.print("Temperature:");
    Serial.print(SHT31D_temp);
    Serial.print("C ,Humidity:");
    Serial.print(SHT31D_humi);
    Serial.println("%");
    Serial.println("");
    Serial.println("HIH6130");
    Serial.print("Temperature:");
    Serial.print(HIH_6130_temp);
    Serial.print("C ,Humidity:");
    Serial.print(HIH_6130_humi);
    Serial.println("%");

    M5.Lcd.setTextColor(WHITE);
    M5.Lcd.setTextSize(2);
    M5.Lcd.setCursor(50, 0);
    M5.Lcd.print("Temperature | Humidity");
    M5.Lcd.setCursor(0, 100);
    M5.Lcd.print("SHT31D    ");
    M5.Lcd.setTextColor(YELLOW);
    M5.Lcd.print(SHT31D_temp);
    M5.Lcd.print("C | ");
    M5.Lcd.print(SHT31D_humi);
    M5.Lcd.print("%");

    M5.Lcd.setTextColor(WHITE);
    M5.Lcd.setCursor(0, 130);
    M5.Lcd.print("HIH6130   ");
    M5.Lcd.setTextColor(YELLOW);
    M5.Lcd.print(HIH_6130_temp);
    M5.Lcd.print("C | ");
    M5.Lcd.print(HIH_6130_humi);
    M5.Lcd.print("%");

    M5.Lcd.setTextSize(2);
    M5.Lcd.setTextColor(WHITE);
    M5.Lcd.setCursor(0, 180);
    M5.Lcd.print("wifi connect");
    WiFi.disconnect(true);
    WiFi.begin(ssid, password);
    Serial.println("wifi connect...");
    byte wifitime = 0;
    M5.Lcd.setTextSize(1.5);
    while (wifitime < 20) { //接続待ち
      delay(500);
      wifitime += 1;
      M5.Lcd.print(".");
      if (WiFi.status() == WL_CONNECTED) {
        wifitime = 20;
      }
    }
    Serial.println("FINISH");
    M5.Lcd.setTextSize(2);
    M5.Lcd.println("");

    if (WiFi.status() == WL_CONNECTED) {
      M5.Lcd.print("wifi connect success");

      ambient.begin(channelid, writekey, &CLIENT);

      ambient.set(1, double(SHT31D_temp));
      ambient.set(2, double(SHT31D_humi));
      ambient.set(3, double(HIH_6130_temp));
      ambient.set(4, double(HIH_6130_humi));
      ambient.send();

      const char* ntpServer = "ntp.nict.jp";
      const long  gmtOffset_sec = 3600 * 9;
      const int   daylightOffset_sec = 0;
      configTime(gmtOffset_sec, daylightOffset_sec, ntpServer);

      struct tm timeinfo;
      if (!getLocalTime(&timeinfo)) {
        M5.Lcd.println("Failed to obtain time");
        return;
      }

      // テキストサイズ指定
      M5.Lcd.setTextSize(3);
      // カーソル位置を設定
      M5.Lcd.setCursor(30, 30);
      M5.Lcd.printf("%04d/%02d/%02d"
                    , timeinfo.tm_year + 1900
                    , timeinfo.tm_mon + 1
                    , timeinfo.tm_mday
                   );
      M5.Lcd.setCursor(30, 60);
      M5.Lcd.printf("%02d:%02d:%02d"
                    , timeinfo.tm_hour
                    , timeinfo.tm_min
                    , timeinfo.tm_sec
                   );


      Serial.print(String((timeinfo.tm_year + 1900)) + "/"
                   + String(timeinfo.tm_mon + 1) + "/"
                   + String(timeinfo.tm_mday) + "  "
                   + String(timeinfo.tm_hour) + ":"
                   + String(timeinfo.tm_min) + ":"
                   + String(timeinfo.tm_sec) + "  "
                  );


      File file;
      file = SD.open(fname, FILE_APPEND);
      if (file) {
        file.println("");
        file.println(String((timeinfo.tm_year + 1900)) + "/"
                     + String(timeinfo.tm_mon + 1) + "/"
                     + String(timeinfo.tm_mday) + "  "
                     + String(timeinfo.tm_hour) + ":"
                     + String(timeinfo.tm_min) + ":"
                     + String(timeinfo.tm_sec) + "  "
                    );
        file.close();
      }

      file = SD.open(fname2, FILE_APPEND);
      if (file) {
        file.print(String(SHT31D_temp) + "," + String(SHT31D_humi) + "," + String(HIH_6130_temp) + "," + String(HIH_6130_humi) + ",");
        file.println(String((timeinfo.tm_year + 1900)) + "/"
                     + String(timeinfo.tm_mon + 1) + "/"
                     + String(timeinfo.tm_mday) + "  "
                     + String(timeinfo.tm_hour) + ":"
                     + String(timeinfo.tm_min) + ":"
                     + String(timeinfo.tm_sec) + "  "
                    );
        file.close();
      }

      WiFi.disconnect(true);

    } else {
      M5.Lcd.print("wifi connect error");
      File file;
      file = SD.open(fname, FILE_APPEND);
      if (file) {
        file.println("");

        file.close();
      }


      file = SD.open(fname2, FILE_APPEND);
      if (file) {
        file.println(String(SHT31D_temp) + "," + String(SHT31D_humi) + "," + String(HIH_6130_temp) + "," + String(HIH_6130_humi));
        file.close();
      }
    }


    File file;
    file = SD.open(fname, FILE_APPEND);
    if (file) {
      file.println("SHT31D: " + String(SHT31D_temp) + "C  " + String(SHT31D_humi) + "%");
      file.println("HIH_6130: " + String(HIH_6130_temp) + "C  " + String(HIH_6130_humi) + "%");
      file.close();
    }


  } else {
    Serial.print(": [ERROR] Code #");
    Serial.println(result.error);
    File file;
    file = SD.open(fname, FILE_APPEND);
    if (file) {
      file.println("");
      file.close();
    }

  }
}
SDは入れておいてください
結果
起動すると、左下に「deep sleep >>> ON」と出てきます。この時に左のボタンを長押しすると、ONとOFFをトグルできます。ですが、普通はONのままです。内臓電池が持ちます。
5秒後にデータをとってLCD表示します
そして、Wifiにつなげようとします。
接続されれば、Ambient送信・時刻受信・SD記録(時刻あり)します
接続されなければ SD記録(時刻なし)します
5分間(初期値) スリープ(deep sleep >>> ONの場合・deep sleep >>> OFFならそのまま)します

M5Stack同士でシリアル通信 [Arduino&M5Stack]
今回は、M5Stack同しでシリアル通信をして、文字列を送信&受信してみました
参考
http://robooptions.blog.fc2.com/blog-entry-9.html
この場合はM5StickCでしたが、M5Stackでやってみました。今はまだシリアル通信でしかできないけど、そのうち、CardKB(M5StackのGroveキーボード)やディスプレイ表示でやりたいです。
スレーブのBluetooth用MACアドレスを調べる
スレーブのM5Stackにこのコードを記述
するとシリアルモニタに「1A:2B:3C:4D:5E:6F」のようなアドレスが出るのでこれを使って…
マスター側
スレーブ側
動作すると、シリアルでの会話(SEND: READ:が出ます)や、M5Stackに過去の履歴の表示ができます。
バグ
・早く送信しまくるとバグる
・;(セミコロン)は送信不可(バグる)
・ディスプレイ表示▲
参考
http://robooptions.blog.fc2.com/blog-entry-9.html
この場合はM5StickCでしたが、M5Stackでやってみました。今はまだシリアル通信でしかできないけど、そのうち、CardKB(M5StackのGroveキーボード)やディスプレイ表示でやりたいです。
スレーブのBluetooth用MACアドレスを調べる
スレーブのM5Stackにこのコードを記述
void setup(void) {
  Serial.begin(115200);
  Serial.println("-----------------");
  uint8_t macBT[6];
  esp_read_mac(macBT, ESP_MAC_BT);
  Serial.printf("%02X:%02X:%02X:%02X:%02X:%02X\r\n", macBT[0], macBT[1], macBT[2], macBT[3], macBT[4], macBT[5]);
}

void loop() {
  delay(1000);
}
するとシリアルモニタに「1A:2B:3C:4D:5E:6F」のようなアドレスが出るのでこれを使って…
マスター側
//This example code is in the Public Domain (or CC0 licensed, at your option.)
//By Victor Tchistiak - 2019
//
//This example demostrates master mode bluetooth connection and pin
//it creates a bridge between Serial and Classical Bluetooth (SPP)
//this is an extention of the SerialToSerialBT example by Evandro Copercini - 2018
//

#include "BluetoothSerial.h"
#include <M5Stack.h>

BluetoothSerial SerialBT;

String MACadd = "1A:2B:3C:4D:5E:6F";//スレーブのアドレス
uint8_t address[6]  = {0x1A, 0x2B, 0x3C, 0x4D, 0x5E, 0x6F};//スレーブのアドレス
//uint8_t address[6]  = {0x00, 0x1D, 0xA5, 0x02, 0xC3, 0x22};
String name = "OBDII";
char *pin = "1234"; //<- standard pin would be provided by default
bool connected;

String History[10] = {"", "", "", "", "", "", "", "", "", ""};

void setup() {
  M5.begin();
  Serial.begin(115200);
  SerialBT.begin("ESP32test", true);
  Serial.println("The device started in master mode, make sure remote BT device is on!");
  M5.Lcd.setTextSize(3), M5.Lcd.setCursor(50, 80), M5.Lcd.print("Connected...");
  connected = SerialBT.connect(address);
  M5.Lcd.setTextSize(2);
  if (connected) {
    M5.Lcd.clear();
  } else {
    while (!SerialBT.connected(10000)) {
      M5.Lcd.clear();
      Serial.println("Failed to connect. Make sure remote device is available and in range, then restart app.");
      M5.Lcd.setTextColor(RED), M5.Lcd.setCursor(0, 80), M5.Lcd.print("Failed to connect");
    }
  }
  delay(3000);
  M5.Lcd.clear();
  M5.Lcd.setTextColor(WHITE), M5.Lcd.setTextSize(2), M5.Lcd.setCursor(0, 0);


  // disconnect() may take upto 10 secs max
  if (SerialBT.disconnect()) {
    Serial.println("Connected Succesfully!");
    M5.Lcd.setTextColor(GREEN), M5.Lcd.setCursor(0, 80), M5.Lcd.print("Connected Succesfully!");
  }
  //this would reconnect to the name(will use address, if resolved) or address used with connect(name / address).
  SerialBT.connect();
}

void loop() {
  if (Serial.available()) {
    String datastring = Serial.readStringUntil(';');
    Serial.print("SEND:" + datastring);
    add("SEND:" + datastring);
    SerialBT.print(datastring);
    //Serial.print("myself:");
    //Serial.print(Serial.readStringUntil(';'));

  }
  if (SerialBT.available()) {
    String datastring = SerialBT.readStringUntil(';');
    Serial.print("READ:" + datastring);
    add("READ:" + datastring);
  }
  delay(20);
}


void add(String addstring) {
  History[9] = History[8];
  History[8] = History[7];
  History[7] = History[6];
  History[6] = History[5];
  History[5] = History[4];
  History[4] = History[3];
  History[3] = History[2];
  History[2] = History[1];
  History[1] = History[0];
  History[0] = addstring;
  M5.Lcd.fillRect(0, 0, 320, 180, BLACK);
  M5.Lcd.setTextColor(WHITE), M5.Lcd.setTextSize(2), M5.Lcd.setCursor(0, 0);
  M5.Lcd.print(History[0]);
  M5.Lcd.print(History[1]);
  M5.Lcd.print(History[2]);
  M5.Lcd.print(History[3]);
  M5.Lcd.print(History[4]);
  M5.Lcd.print(History[5]);
  M5.Lcd.print(History[6]);
  M5.Lcd.print(History[7]);
  M5.Lcd.print(History[8]);
  M5.Lcd.print(History[9]);
  M5.Lcd.fillRect(0, 180, 100, 100, BLACK);
}
スレーブ側
//This example code is in the Public Domain (or CC0 licensed, at your option.)
//By Evandro Copercini - 2018
//
//This example creates a bridge between Serial and Classical Bluetooth (SPP)
//and also demonstrate that SerialBT have the same functionalities of a normal Serial

#include "BluetoothSerial.h"
#include <M5Stack.h>

String History[10] = {"", "", "", "", "", "", "", "", "", ""};
String sendstring = "";

#if !defined(CONFIG_BT_ENABLED) || !defined(CONFIG_BLUEDROID_ENABLED)
#error Bluetooth is not enabled! Please run `make menuconfig` to and enable it
#endif

BluetoothSerial SerialBT;

void setup() {
  M5.begin();
  Serial.begin(115200);
  SerialBT.begin("ESP32test"); //Bluetooth device name
  Serial.println("The device started, now you can pair it with bluetooth!");
}

void loop() {
  if (Serial.available()) {
    String datastring = Serial.readStringUntil(';');
    Serial.print("SEND:" + datastring);
    add("SEND:" + datastring);
    SerialBT.print(datastring);
    //Serial.print("myself:");
    //Serial.print(Serial.readStringUntil(';'));

  }
  if (SerialBT.available()) {
    String datastring = SerialBT.readStringUntil(';');
    Serial.print("READ:" + datastring);
    add("READ:" + datastring);
  }
  delay(20);
}

void add(String addstring) {
  History[9] = History[8];
  History[8] = History[7];
  History[7] = History[6];
  History[6] = History[5];
  History[5] = History[4];
  History[4] = History[3];
  History[3] = History[2];
  History[2] = History[1];
  History[1] = History[0];
  History[0] = addstring;
  M5.Lcd.fillRect(0, 0, 320, 180, BLACK);
  M5.Lcd.setTextSize(2), M5.Lcd.setCursor(0, 0);

  for (byte i = 0; i = 9; i++) {
    if (History[i].charAt(0) == 'S'){
      M5.Lcd.setTextColor(WHITE);
    }else{
      M5.Lcd.setTextColor(YELLOW);
    }
    M5.Lcd.print(History[i]);
  }
}
動作すると、シリアルでの会話(SEND: READ:が出ます)や、M5Stackに過去の履歴の表示ができます。
バグ
・早く送信しまくるとバグる
・;(セミコロン)は送信不可(バグる)
・ディスプレイ表示▲
M5Stackで温度・湿度計 SD保存・ネットクラウド保存付きを作りました [Arduino&M5Stack]
どうも8√3です。
今回は、タイトルのとうり、Arduinoを使ってM5Stackを動かし、温度・湿度計を作りました。また、SD保存、クラウド保存も実現させました
------------------------------------------------------------------------------------------------------------------------------------------------------
目次
1.使うものは…
1-1.M5Stack Glay
1-2.温湿度をはかるSHT31
1-3.Ambientの設定など
2.配線
3.使うライブラリ
3-1.M5Stack.h(インストール必要)
3-2.ClosedCube_SHT31D.h(インストール必要)
3-3.Ambient.h(インストール必要)
3.4.Wire.h(元から入っている)
3-5.WiFi.h(元から入っている)
3-6.time.h(元から入っている)
4.コーディング
4-1.表示+SD保存
4-2.表示+SD保存+Ambient
5.結果
6.さいごに
------------------------------------------------------------------------------------------------------------------------------------------------------
1.使うものは...
ここでは、使用するものを紹介します
1.M5Stack Glay
M5stackの基本形です。M5stack Cなどでもよいですが、文法や、字の書く場所などが変わってきます。
2.温湿度をはかるSHT31
今回使う温湿度計です。小さいです。
写真:後程
3.Ambient
今回、クラウドデータに保存するためのサーバーです。ここで、初期設定をしておきます
1.Ambientに行く
https://ambidata.io/
↑ここへアクセス
2.ログインまたはアカウント作成
メールアドレスとパスワードの設定のみです。
Scratchホームページで作ろう・遊ぼう・楽しもう・Scratcherになろう [Scratch]
どうも 8√3です。
僕は、Scratchをやってます。2年はやっているので、たくさんのことが分かります。
今回は、そんなScratchのオンラインについて説明していきます。
https://scratch.mit.edu/
ここに行くと、Scratchのホームページです。ここで、
「作る」「見る」「アイデア」などを見ることができます。
みんなの作品を見たり、リミックスしたり(改造して公開)、スタジオを見ることもできます(作品の集まり)
詳しくは、ホームページにあるScratchについてを見てください
また、作ることもできます。がめん右上の「サインイン」を押して、サインイン、もしくは新規登録をしてください。作った作品を公開したり、スタジオを作ったりできます。
8√3のアカウントはこちら。フォローお願いします
※harukei3で運営しています
https://scratch.mit.edu/users/harukei3/
Scratchには、登録するとNewScratcherとして扱われますが、ほかの作品を評価したり、自分で作品を出すなど、Scratchに積極的な活動をすると、Scratcherに招待されます画面上のメールのところに、Scratcherになりませんか みたいに出てきます。登録すると…
オンラインプレイ
などが可能になります
あると思うけど、オンラインゲームがたくさんありますが、NewScratcherは、オンラインプレイができません。Scratcherになると、クラウド変数の使用が可能になり、Scratchをいっそう楽しめます
クラウド変数は、変数を作るところで選べます。10個までです
このように、Scratchのホームページは、いろんなことができて楽しめます。
是非、みんなも楽しんでください
逃走中オンライン制作中
https://hrt-13856.blog.ss-blog.jp/2020-09-19
逃走中オンライン作成中 Scratch [Scratch]
どうも 8√3です
今、Scratchで、
逃走中オンラインを作成中
です。
とある人と組んで作成しています。
できたら更新します。
できたらみんなやってね
アカウント応援よろしく
https://scratch.mit.edu/users/harukei3/
注意
作成中スタジオ見ないでください
また更新します(出来具合とか)
今、Scratchで、
逃走中オンラインを作成中
です。
とある人と組んで作成しています。
できたら更新します。
できたらみんなやってね
アカウント応援よろしく
https://scratch.mit.edu/users/harukei3/
注意
作成中スタジオ見ないでください
また更新します(出来具合とか)
前の10件 | -


